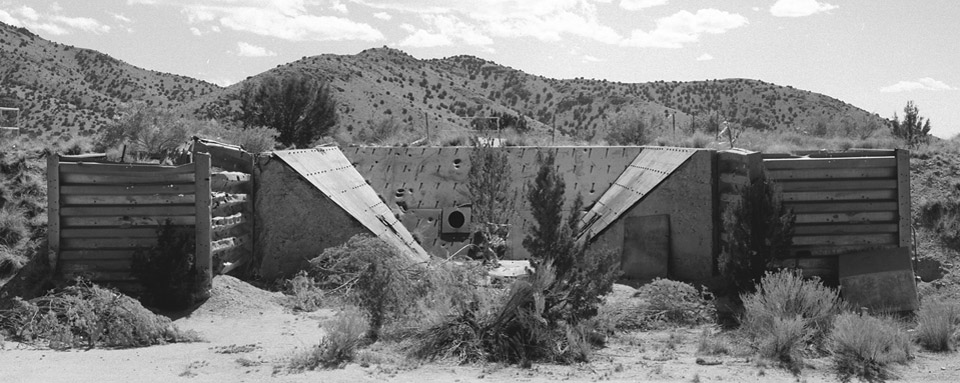
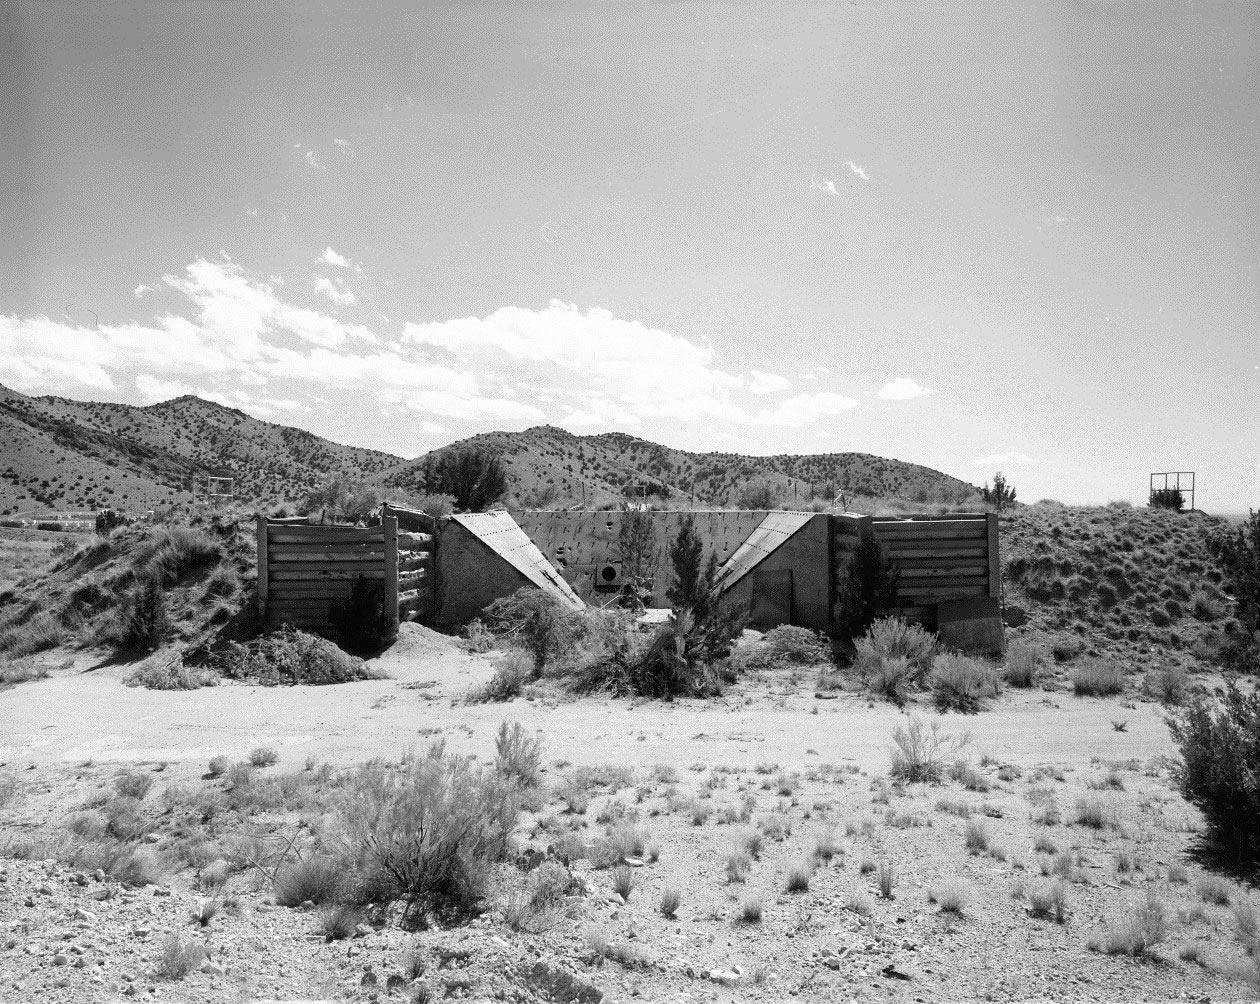
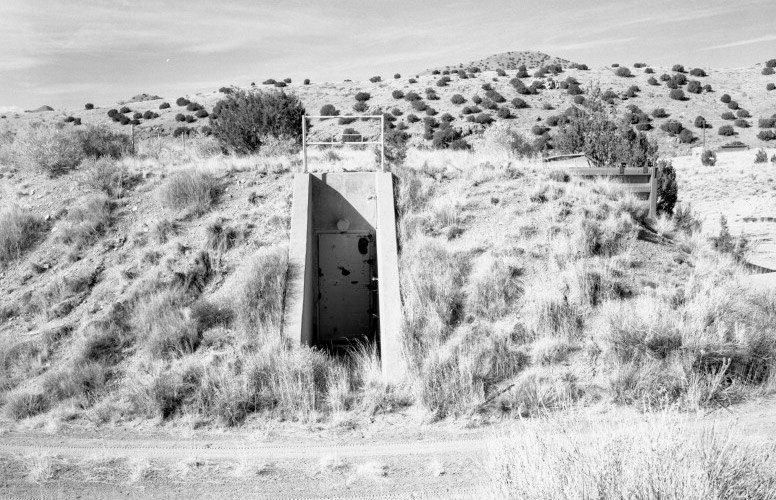
The Halo Bunker or Building S9800B is a firing pit for explosives testing. It is a three-sided concrete structure with steel panels lining the interior of the firing pit. It is open on the north side. Earth-covered bunkers to house equipment extend from the firing pit on the west, south, and east sides. It was built in 1964 to support Sandia’s Project Halo, a study of whether explosives could be used to boost a laser’s power.
Project Halo ran from 1961 through 1964 and included 11 tests. The first tests were conducted on open ground, the final two in the Halo Bunker/Firing Pit (Building S9800B). Those two test shots were completed in 1964. The firing pit was subsequently used on an ad hoc basis for explosive testing, primarily for flyer-plate studies. It was demolished in 2002.
The Beginnings of Laser Research
In 1960, Theodore Maiman, a physicist at the Hughes Research Laboratory in Malibu, California, developed the first laser. The laser could produce short pulses of intense light and it sparked the imagination of the entire scientific community. Scientists dove into innovative programs to develop applications for the laser in a wide range of fields, including communication, weapons, health, and energy research.
Sandia was an early participant in laser studies. As early as 1960, for example, the lab’s explosives development organization had a laser laboratory for testing ordnance. Investigations included determining which explosive compounds were sensitive to laser initiation. In 1961, Sandia initiated research to determine whether explosives could be used to boost a laser’s energy.
Project Halo research included a series of experiments on a design for a high energy ruby laser. A canister of Argon gas was surrounded by explosives and ignited remotely. The resulting implosion powered the ruby laser and produced a high-energy laser discharge.
Coyote Test Field – Building 9800

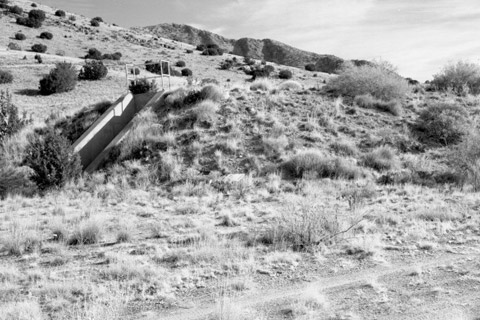
As early as 1950, Sandia needed land on which to conduct more hazardous tests using explosives. In conjunction with the Armed Forces Special Weapons Project, Sandia began conducting explosive testing on model structures to understand the principles of blast loading. This testing was done at Coyote Test Field, an area south of the main technical areas on Kirtland Air Force Base that had been used during World War II for the proximity fuze testing program operated by Dr. E. J. Workman of the University of New Mexico. The Coyote Test Field eventually encompassed approximately 7,100 acres of land.
In 1954, Sandia’s Plant Engineering organization completed Building 9800, a small concrete bunker for explosives test preparation and data recovery on a sloping hillside north of the road winding through Lurance Canyon. This site was not associated with any specific testing effort but could be used by any of Sandia’s explosive test programs. Testing at the site was done on an open piece of ground southeast of Building 9800.
The first Halo tests were conducted in a secluded site in the mountains near Coyote Canyon. However, the environment proved to be too rugged for the data capture equipment. The tests were then moved to a more protected area within Coyote Test Field, close to Building 9800. Tests were conducted in the open air surrounded by an earth embankment and dug out holes holding cables for equipment set-up.
The site included a small concrete observation building that also provided storage.
Building S9800B
This location was used for most of the Halo experiments and it is where the new firing pit, identified as Building S9800B was built. The firing pit was built on the south edge of the leveled area, with the earth berm that covers its bunkers rising around it to the south.
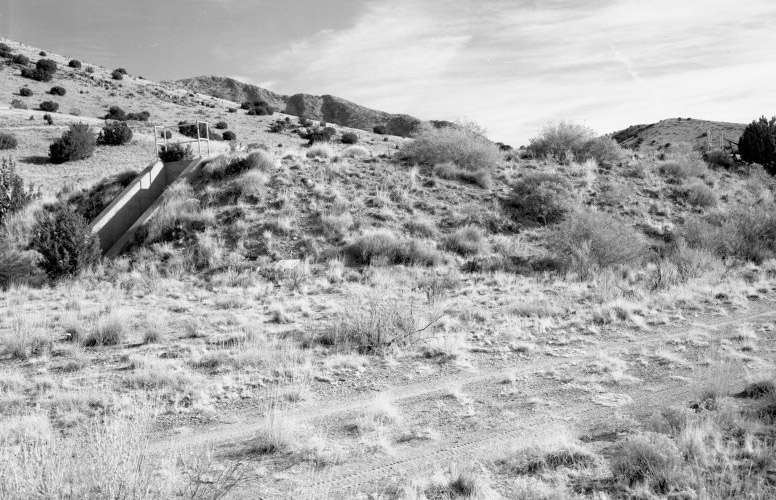
The site became overgrown when the firing pit was no longer used. The structure easily blended into the landscape. The firing pit in the center is open on the north side between the retaining walls that hold back the earth berm.
Building Design

Sandia’s Plant Engineering organization designed and built S9800B. The structure is an open-air three-sided firing pit surrounded on its west, south, and east sides by metal earth-covered instrumentation bunkers identified as Bunkers 1, 2, and 3, respectively. The firing pit is reinforced concrete, its interior lined with layers of plywood topped with steel panels and attached to three concrete walls with anchor bolts. Each side of the firing pit has a porthole with an observation tube extending back through the concrete wall to an expansion chamber. The expansion chamber then connects through a 1′ 6″ concrete wall into the instrumentation bunker, allowing data to be captured and relayed to recording systems inside. The only alteration to the building from its original design was the replacement of the sandbags that served as retaining walls at the outside (north) edge of the east and west sides of the firing pit. In 1964, shortly after the structure’s completion, these were replaced with Armco metal retaining walls.

Retaining walls hold back the earth berm covering the bunker that extends from the east and west sides of the firing pit. The retaining walls and the concrete edge of the firing pit display damage from explosives testing. The Armco metal retaining walls were produced and sold by Armco Steel Corporation, formerly The American Rolling Mill Company. In 1978, Armco Steel Corporation became Armco Inc. In 1999, Armco Inc. merged with AK Steel Corporation. Armco produced rolled steel products used widely in American industry. The company’s products are ubiquitous in road barriers, culverts, and a multitude of different types of pre-fabricated, pre-painted steel panel buildings. Armco products are found throughout the military and nuclear weapons complex test facilities built in the second half of the 20th century.
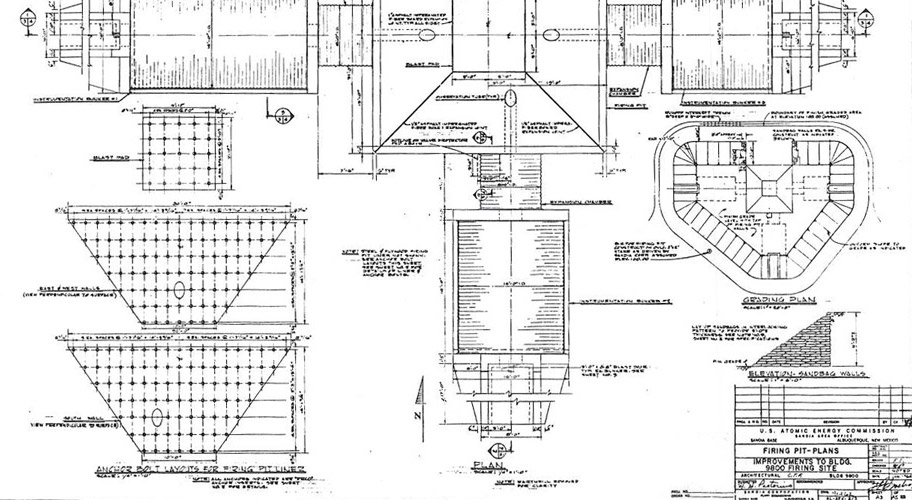
The firing pit is in the top center of the drawing with Bunker 1 on the left (west side), Bunker 2 on the bottom (south side), and Bunker 3 to the right (east side).
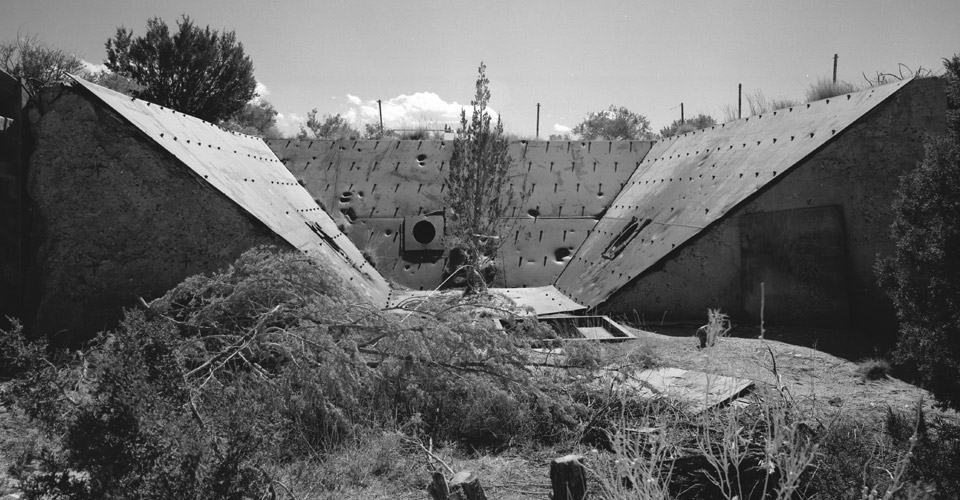
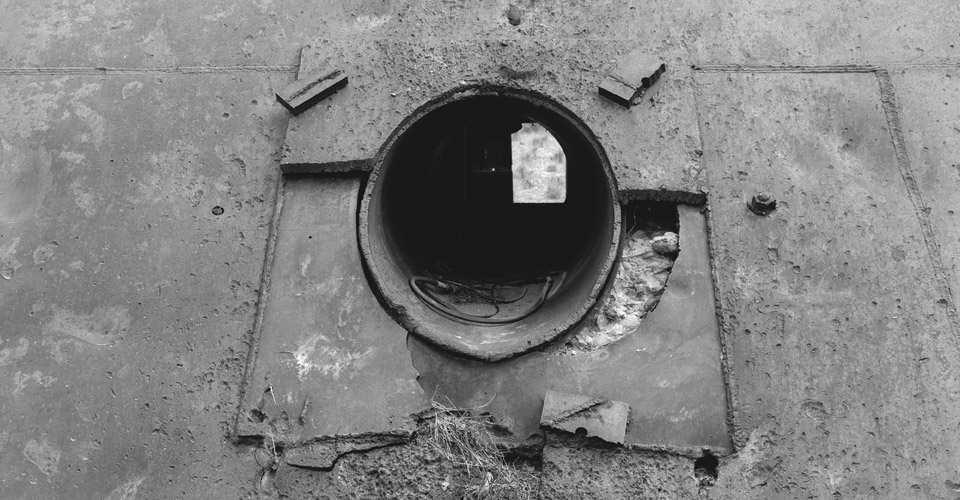
The Firing Pit is a 3-sided concrete structure that forms an inverted trapezoid 30′ wide at the top tapering to 10′ wide at the bottom. The floor of the center of the structure is a square blast pad measuring 9′ 1″ on each side. The three side walls and the bottom of the firing pit are covered with 3 layers of ¼” plywood and a ½” steel firing pit liner attached to the concrete with metal anchor bolts. The bottom panel of the pit became detached over time.

The open north side of the pit has a concrete apron extending out to the north edges of the east and west sides. Just north of the bottom of the firing pit, there is a steel and concrete opening into the ground, which holds a metal-framed box with steel lining extending approximately 1′ down with concrete walls below that. This is the firing unit well, which allowed access to cables for equipment set-up. Cables entered the box via opening on the right (west) side. Steel panels formed a cover.
The bunkers are surrounded by and covered in an earth berm rising 11′ 2″ to the top edge of the firing pit. It is held in place along the north edge by Armco metal retaining walls. On the west, south, and east sides it slopes down to the front edge of each bunker entrance, held in place by 1′ thick concrete walls extending 17′ from the bunker’s outer wall.

The Armco retaining wall on the outer edge of the east side of the firing pit reflects damage from multiple tests.
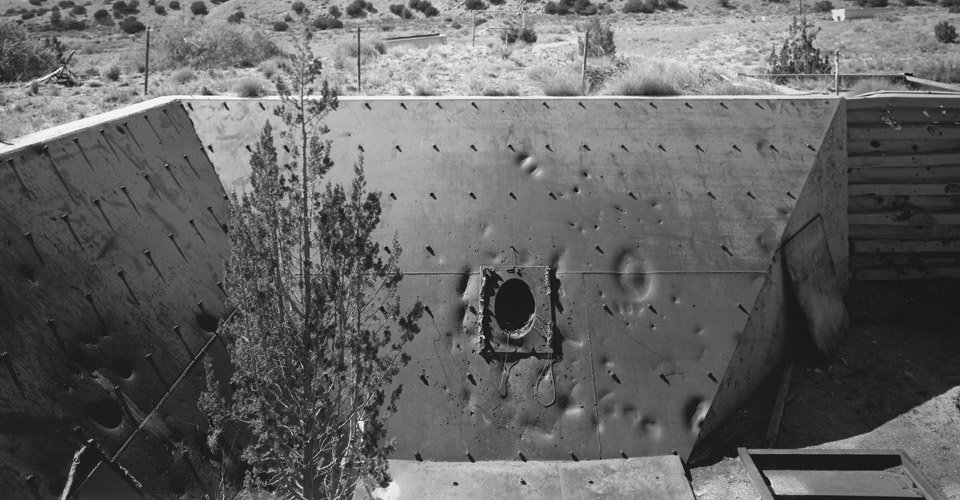
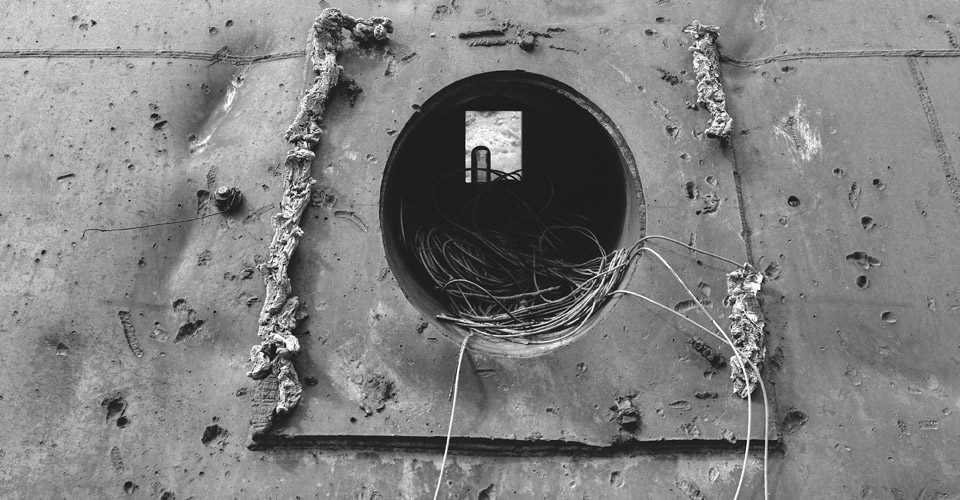
Each of the three side walls has a porthole extending from the inner walls of the firing pit into an extension chamber and on into one of the bunkers, where equipment captured the test event.
The porthole in the south side of the firing pit leads into Bunker 1. The steel plate covering the firing pit’s interior shows damage from testing. Remains of the gutta percha used to attach covers to the porthole are visible around the edge of the steel plate surrounding it.
The east side porthole opens to the expansion chamber extending to the west wall of Bunker 3. The steel plate surrounding the porthole on the wall of the firing pit is broken and damaged from testing and age. The nuts on the anchor bolts holding the steel plate to the wall of the firing pit are visible.
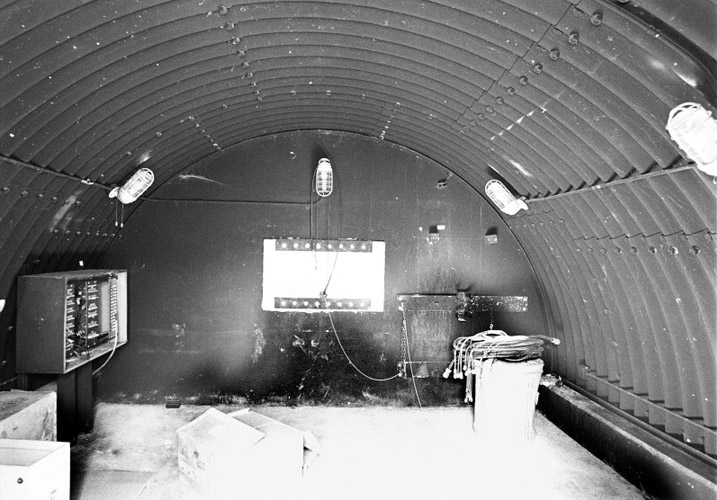
Each bunker is a one-story structure extending out from the firing pit. Bunker 1 is 14′ wide x 24′ long; its east and west end walls are 1′ 6″ thick. Bunker 2 (the south bunker) is 14′ wide x 12′ long; its north wall is 1′ 6″ thick concrete and the south wall is 1′ 5″ thick concrete. Bunker 3 is 14′ wide x 14′ long with a 1′ 5″ thick concrete wall on the west and a 1′ 6″ concrete wall on the east end. A 7′ 6″ long x 8′ wide expansion chamber extends from the exterior west wall to the back wall of firing pit. Each bunker is formed from a curved steel arch that rests on a concrete berm and has a poured concrete floor. A steel-reinforced rectangular opening in the center of the interior (firing pit side) wall provides a view through an expansion chamber to the porthole in the side of the firing pit. The interior of Bunker 3 is painted matte black to absorb light. In the center of the west wall, the rectangular steel-reinforced opening provides a view through the expansion chamber extending to the porthole in the firing pit. A signal rack stands on the left (south) wall to the left of the expansion chamber opening. Lights are in metal cages to reduce the chance of breakage.
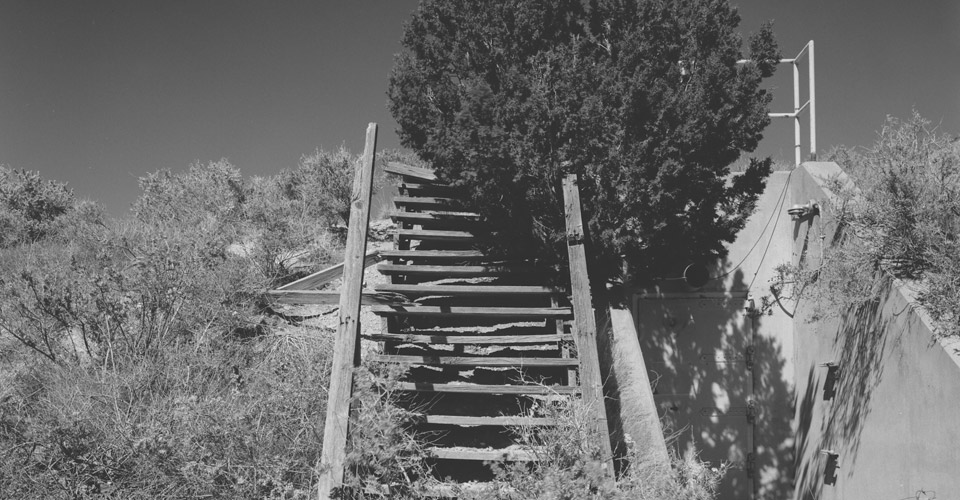
Wood stairs on the exterior of the structure’s south side provided access to the top. The concrete entrance to Bunker 2 is also on the structure’s south side.
The stairs fell into disrepair once testing ended at the site.
Twin 1′ thick concrete retaining walls extend 17′ from each bunker, forming an entryway to each. Each has a metal pedestrian door for entry. At Bunker 3, a metal safety railing is visible above the bunker entrance and the Armco retaining wall on the east side of the firing pit is visible on the far right. The earth berm covering the bunkers is covered in native vegetation.
The Tests
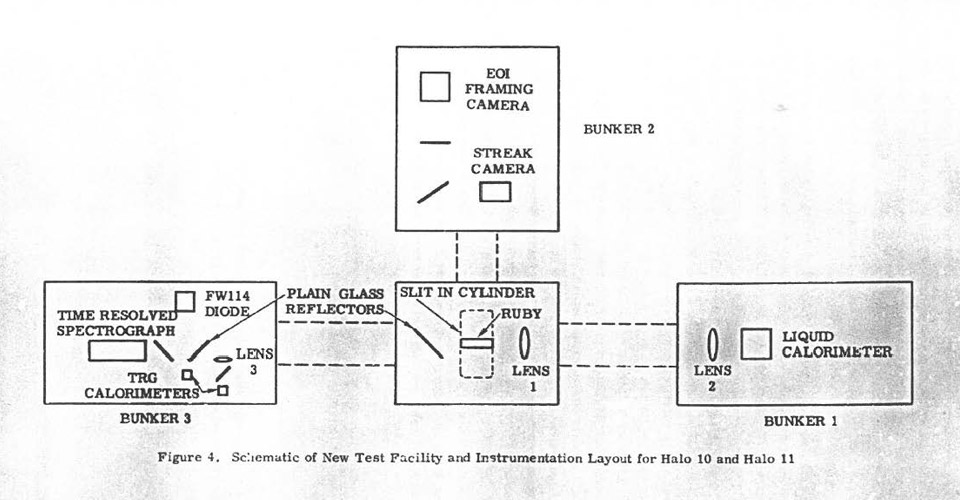
In the last two Halo tests, the ruby laser was placed in the center of a cylinder lined with high explosives. The laser was triggered at 48 points located uniformly around the circumference of the canister. Bunker 1 housed a liquid calorimeter capable of detecting energy as small as 20 joules. The calorimeter captured the ruby beam through a system of lenses.
Bunker 2 housed two cameras: an Avco streak camera observed the laser output and the advance of the luminous front while an Electro-Optical Instruments (EOI) framing camera observed the output of the ruby on a screen. The cameras captured about 20% of the ruby output exiting a slit in the cylinder by means of a plain glass beam splitter.
Bunker 3 housed two TRG calorimeters, an FW114 photo diode, and a time resolved spectrograph. Two plain glass reflectors and a lens captured beam energy and recorded it.
The Historic Designation
Although associated with Sandia’s early laser research, the Halo Bunker is of historic significance for its design, rather than the scientific tests that occurred there. It is significant because its design reflects the refinement of explosive testing into a more data dependent, innovative testing environment at Sandia.
In the early years of explosives research and development, explosive tests were conducted in open areas with scientists and equipment situated away from the blast or in a protective bunker. Results of the blast were evaluated after the event. At Sandia, as explosive testing matured, scientists developed a more controlled environment for explosive testing. Test sites more closely mirrored laboratories with a contained test area and data capture equipment located close to the blast site. From a protected environment, scientists and/or their equipment could capture details of an event while it was happening.
The Halo Bunker’s design placed data capture equipment as close as possible to the test without being destroyed during the experiment. It is associated with Sandia’s established Cold War themes of weapon design, field testing, and environmental testing within its nuclear weapons mission.
In 2001, the Department of Energy/National Nuclear Security Administration/Sandia Field Office, in consultation with the New Mexico State Historic Preservation Officer, determined that the Halo Bunker/Firing Pit was eligible for the National Register of Historic Places.
End of Life
After the Halo test series ended in 1964, the Firing Pit was not assigned to a specific project or group. Instead, it functioned as a generic explosive test site that could be used by any group that needed the capabilities or configuration that the site provided. The Firing Pit could accommodate an explosion of approximately 50 pounds of explosives and provide data capture for the event. The site was frequently used for flyer-plate studies. Typically, an explosive charge was used to accelerate a plate made of steel, aluminum, or copper towards a target. Other testing included shrapnel studies, blast force tests, and penetrator studies. The Firing Pit ceased to be used for any type of testing in the 1990s. It underwent decontamination and demolition in 2002.
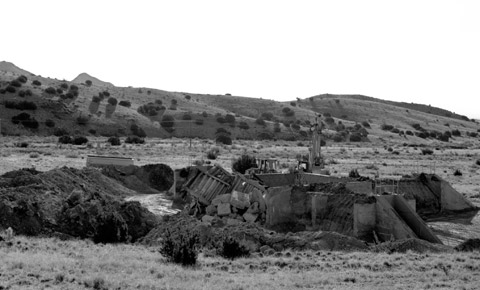
In late 2002 and into 2003, the Firing Pit was demolished and the site restored. The facilities crew allowed the photographer to obtain a few shots of the demolition activity, which revealed the structure’s underlying construction.
In this view from the northwest, the steel plates lining the firing the firing pit have been removed and the pit collapsed into rubble (center of photograph; north edge of structure). The earth berms have been removed from the bunker revealing their underlying constructing. Bunker 1 (the west bunker) is visible in the right foreground—note the concrete walls at the front and back of the bunker, as well as the corrugated metal room construction. Bunker 2 (south bunker) is visible to the right and behind Bunker 1.
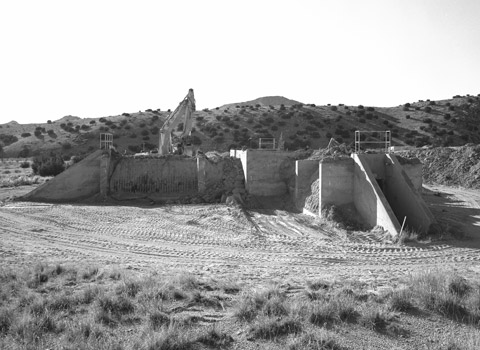
Bunker 2 (south bunker) on the left and Bunker 3 (east bunker) on the right. The concrete entryways and walls at the front and back of each bunker are clearly visible, as is the east wall of the firing pit.

With the earth berm scraped away, the concrete retaining walls and metal room exterior of Bunker 1 (west bunker) are visible.