Introduction
Let’s take what we learned and go one step further. Manually specifying IPs is annoying; let’s auto configure IPs with dnsmasq.
Clean up
minimega:/tmp/minimega/minimega$ nuke
# /home/ubuntu/launchme.sh new
Example
# minimega -attach
tap create 100 ip 10.0.0.1/24
vm config disk /home/ubuntu/tinycore.qcow
vm config memory 128
vm config net 100
dnsmasq start 10.0.0.1 10.0.0.2 10.0.0.254
vm launch kvm linux[1-10]
vm start all
Explanation
Let’s break down the new commands.
minimega:/tmp/minimega/minimega$ tap create 100 ip 10.0.0.1/24
2016/08/26 16:36:16 WARN vlans.go:334: Blacklisting manually specified VLAN 100
ubuntu: mega_tap0
In this step we are creating a network into the VLAN 100 network and assign ourselves an ip address of 10.0.0.1 with a CIDR netmask of /24.
This makes it so the server can talk on VLAN 100 and communicate with TCP/IP to VMs in the IP address space of 10.0.0.1-10.0.0.254.
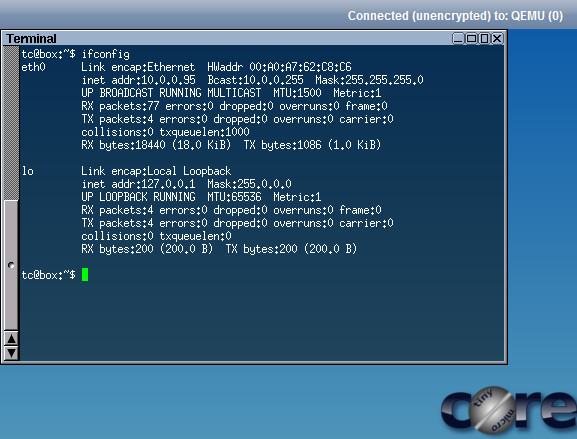
root@ubuntu:~/minimega# ping 10.0.0.95
PING 10.0.0.95 (10.0.0.95) 56(84) bytes of data.
64 bytes from 10.0.0.95: icmp_seq=1 ttl=64 time=1.36 ms
64 bytes from 10.0.0.95: icmp_seq=2 ttl=64 time=0.705 ms
64 bytes from 10.0.0.95: icmp_seq=3 ttl=64 time=0.514 ms
^C
--- 10.0.0.95 ping statistics ---
3 packets transmitted, 3 received, 0% packet loss, time 2000ms
rtt min/avg/max/mdev = 0.514/0.861/1.366/0.366 ms
The next new command starts a dnsmasq service on the network tap we created on 10.0.0.1
dnsmasq start 10.0.0.1 10.0.0.2 10.0.0.254
Which starts handing out IP addresses from 10.0.0.2-10.0.0.254 for any machine that asks for one with DHCP.
Going Further
Running multiple DHCP servers on different VLANs
minimega:/tmp/minimega/minimega$ tap create 100 ip 10.0.0.1/24
minimega:/tmp/minimega/minimega$ tap create 101 ip 11.0.0.1/24
minimega:/tmp/minimega/minimega$ dnsmasq start 10.0.0.1 10.0.0.2 10.0.0.254
minimega:/tmp/minimega/minimega$ dnsmasq start 11.0.0.1 11.0.0.2 11.0.0.254
Print running DHCP servers
minimega:/tmp/minimega/minimega$ dnsmasq
host   | ID | Listening Address | Min      | Max        | Path                            | PID
ubuntu | 0  | 10.0.0.1          | 10.0.0.2 | 10.0.0.254 | /tmp/minimega/dnsmasq_826235649 | 3216
ubuntu | 1  | 11.0.0.1          | 11.0.0.2 | 11.0.0.254 | /tmp/minimega/dnsmasq_264204396 | 3610
Killing dnsmasq servers
minimega:/tmp/minimega/minimega$ dnsmasq kill 0
minimega:/tmp/minimega/minimega$ dnsmasq
host   | ID | Listening Address | Min      | Max        | Path                            | PID
ubuntu | 1  | 11.0.0.1          | 11.0.0.2 | 11.0.0.254 | /tmp/minimega/dnsmasq_264204396 | 3610
You can start dnsmasq with a configuration file
dnsmasq start 10.0.0.1 10.0.0.2 10.0.254.254 /tmp/dnsmasq-extra.conf
Set up a static IP allocation for a VM with the MAC address 00:11:22:33:44:55
dnsmasq configure 0 ip 00:11:22:33:44:55 10.0.0.127
Add a DNS entry resolving a domain to an IP
dnsmasq configure 0 dns 10.0.0.127 myexample.com
Add a DHCP option
dnsmasq configure 0 options option:dns-server,10.0.0.128
Authors
The minimega authors
30 May 2017