Cubit 15.9 User Documentation
The Split Surface command divides one or more surfaces into multiple surfaces. The command results are similar to imprint with curve. However, curve creation is not necessary for splitting surfaces. Three primary forms of the command are available.
The first form splits a single surface using locations while the second splits by extending a surface hard-line until it hits a surface boundary. The split automatic splits either a single surface or a chain of surfaces in an automatic fashion.
Two forms of Split Across are available:
Split Surface <id> Across [Pair] Location <options multiple locs> [Preview [Create]]
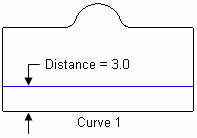
Split Surface <id> Across Location <multiple locs> Onto Curve <id> [Preview] Create]]
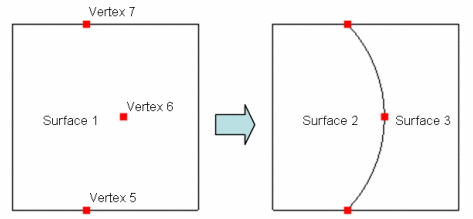
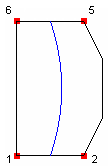
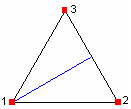
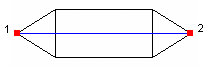
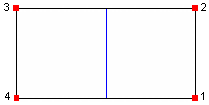
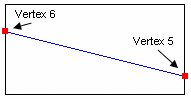
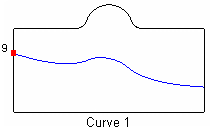
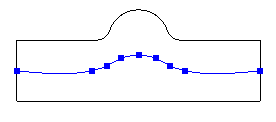
This command splits a surface with a spline projection through multiple locations on the surface. See Location, Direction, and Axis Specification for a detailed description of the location specifier. Figure 1 shows a simple example of splitting a single surface into two surfaces. A temporary spline was created through the three specified locations (Vertex 5 6 7), and this curve was used to split the surface.
split surface 1 across location vertex 5 6 7
Figure 1 - Splitting Across with Multiple Locations
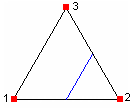
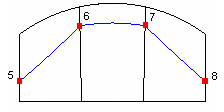
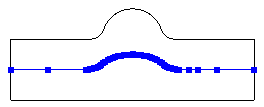
The Pair keyword will pair locations to create multiple surface splitting curves (each defined with two locations). An even number of input locations is required. Figure 2 shows an example:
split surface 1 across pair vertex 5 7 6 8
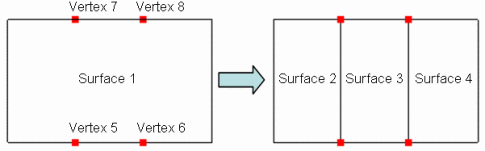
Figure 2 - Splitting Across with Pair Option
The Preview keyword will show a graphics preview of the splitting curve. If the Create keyword is also specified, a free curve (or curves) will be created - these are the internal curves that are used to imprint the surfaces.
The Onto Curve format of the command takes one or more locations on one side of the surface and projects them onto a single curve on the other side of the surface. Figure 3 shows an example:
split surface 1 across vertex 5 6 onto curve 4
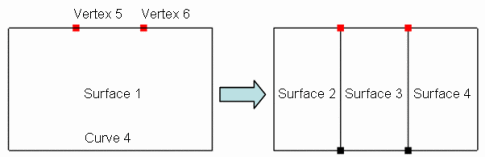
Figure 3 - Splitting Across with Onto Curve
The Split Extend function can be called with the following command:
Split Surface <id_list> Extend [Vertex <id_list> | AUTO] [Preview [Create]]
With the following settings:
Set Split Surface Extend Normal {on|OFF}
Set Split Surface Extend Gap Threshold <val>
Set Split Surface Extend Tolerance<val>
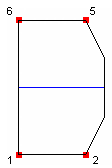
This command splits a surface by extending a surface hard-line until it hits a surface boundary. Figure 4 shows a simple example of extending a curve. The hard-line curve was extended from the specified vertex until it hit the surface boundary.
split surface 1 extend vertex 2

Figure 4 - Splitting by Extending Hard-line
The auto keyword will search for all hard-lines and extend them according to the Split Surface Extend settings. Figure 5 shows an example:split surface 1 extend auto
Figure 5 - Splitting by Extending with Auto Option
The preview keyword will show a graphics preview of the splitting curve. If the create keyword is also specified, a free curve (or curves) will be created - these are the internal curves that are used to imprint the surfaces.
The normal setting can be turned on or off. When it is on, Cubit will attempt to extend the hard-line so that it is normal to the curve it will intersect. An example of this is in Figure 6:set split surface normal on
split surface 1 extend vertex 2
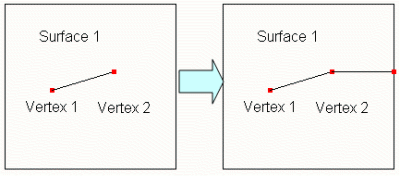
Figure 6 - Splitting by Extending a Hard Line with Normal Setting ON
Cubit uses the gap threshold to decide whether or not to extend a hard-line when the user specifies auto. If the distance between a vertex on a hard-line and the curve it will hit is greater than the gap threshold, then Cubit will not extend that hard-line. The default value is INFINITY, and can be set to any value. To reset the value back to INFINITY, set the gap threshold to -1.0. Note: This setting only applies when using the keyword auto. An example of using the gap threshold is shown in Figure 7:
set split surface gap threshold 2.0
split surface 1 extend auto
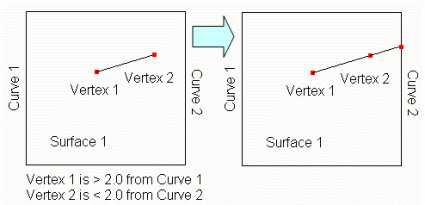
Figure 7 - Extending Hard-lines with Gap Threshold = 2.0.
(Notice Vertex 1 was not extended because it exceeded the gap threshold)
The tolerance setting can be used to avoid creating short curves on the surface boundary. If Cubit tries to extend a hard-line that comes within tolerance of a vertex, it will instead snap the extension to the existing vertex. An example of this is shown in Figure 8:
set split surface tolerance 1.0
split surface 1 extend vertex 2
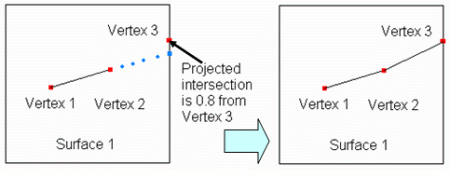
Figure 8 - Extending Hard-lines with Tolerance
(Notice the extension snapped to Vertex 3)
This form of the command splits a single surface or a chain of surfaces in an automatic fashion. It is most convenient for splitting a fillet or set of fillets down the middle - oftentimes necessary to prepare for mesh sweeping. These surfaces cannot have multiple curve loops.
Split Surface <id_list> [Corner Vertex <id_list>] [Direction Curve <id>] [Segment|Fraction|Distance <val> [From Curve <id>]] [Through Vertex <id_list>] [Parametric <on|OFF>] [Tolerance <val>] [Preview [Create]]
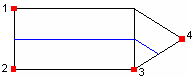
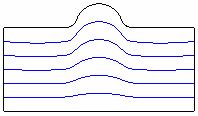
The volume shown in Figure 9 was quickly prepared for sweeping by splitting the fillets and specifying sweep sources as shown (with the sweep target underneath the volume). The surface splits are shown in blue.
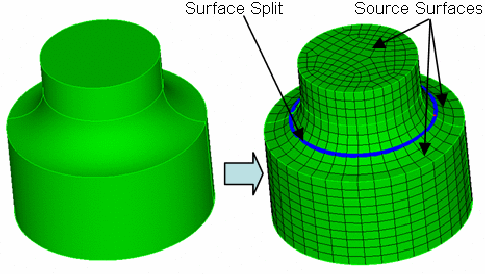
Figure 9 - Splitting Fillets to Facilitate Sweeping
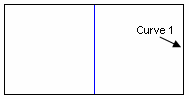
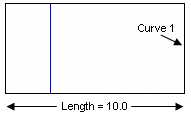
Each surface is always split with a single curve along the length of the surface (or multiple single curves if the Segment option is used). The splitting curve will either be a spline, arc or straight line.
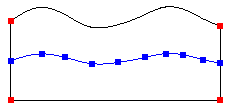
The Split Surface command analyzes the selected surface or surface chain to find a logical rectangle, containing four logical sides and four logical corners; each side can be composed of zero, one or multiple curves. If a single surface is selected (with no options), the logical corners will be those closest to 90 and oriented such that the surface will be split parallel to the longest aspect ratio of the surface. If a chain of surfaces is selected, the logical corners will include the two corners closest to 90 on the starting surface of the chain and the two corners closest to 90 on the ending surface of the chain (the split will always occur along the chain).
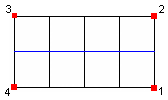
In Figure 10, the logical corners selected by the algorithm are Vertices 1-2-5-6. Between these corner vertices the logical sides are defined; these sides are described in Table 1. The default split occurs from the center of Side 1 to the center of Side 3 (parallel to the longest aspect ratio of the surface), and is shown in blue.
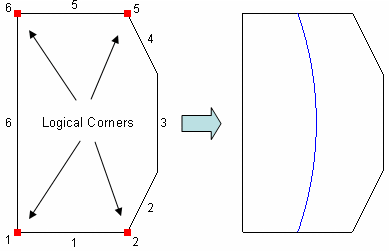
Figure 10 - Split Surface Logical Properties
Table 1. Listing of Logical Sides for Figure 10
|
Logical Side
|
Corner Vertices
|
Curve Groups
|
|
1
|
1-2
|
1
|
|
2
|
2-5
|
2,3,4
|
|
3
|
5-6
|
5
|
|
4
|
6-1
|
6
|
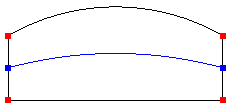
Figure 11 shows a surface along with 2 possibilities for its logical rectangle and the resultant splits.
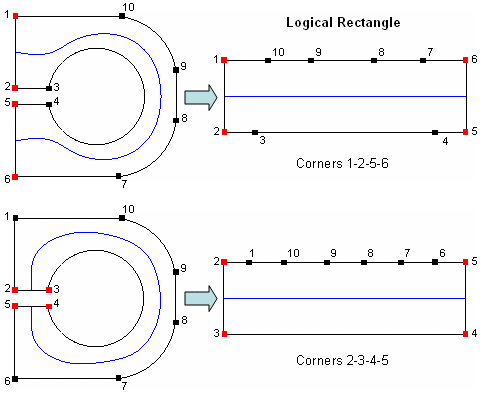
Figure 11 - Different Possible Logical Rectangles for Same Surface
Table 2 shows various surfaces and the resultant split based on the automatically detected or selected logical rectangle. Note that surfaces are always traversed in a counterclockwise direction.
Table 2 - Sample Surfaces and Logical Rectangles|
Surface(s) (Resultant Split in Blue)
|
Ordered Corners (to form the Logical Rectangle)
|
 |
1-2-3-4
(using aspect ratio) |
 |
4-1-2-3
(user selected) |
 |
1-2-5-6
|
 |
2-5-6-1
|
 |
1-2-3-4 (split is always along the chain) |
 |
1-2-3-4 (notice triangular surfaces along the chain) |
 |
1-1-2-3 (note side 1 of the logical rectangle is collapsed; side 3 is from vertex 2 to 3) |
 |
1-2-2-3 (note side 2 of the logical rectangle is collapsed) |
 |
1-2-3-4
|
 |
1-2-4-4
|
 |
1-1-2-2
|
 |
1-1-2-2 (selected automatically) |
If a chain of surfaces are split, the surfaces will always be split along the chain. The command will not allow disconnected surfaces.
For a single surface, the split direction logic is a bit more complicated. If no options are specified, the surface aspect ratio determines the split direction - the surface will be split parallel to the longest aspect ratio side through the midpoint of each curve. This behavior can be overridden by the order the Corner vertices are selected (the split always starts on the side between the first two corners selected), the Direction option, the From Curve option, or the Through Vertex list.
Table 3 shows examples of the various split orientation methods. These options are explained in more detail in the sections below.
Table 3 - Split Orientation Methods
|
Surface Example
|
Split Orientation Method
|
 |
Multiple surfaces are always split along the chain
|
 |
Parallel to longest surface aspect ratio (default)
|
 |
Corner Vertex 4 1 2 3 (split always starts on side 1 of the logical rectangle) |
 |
Direction Curve 1
|
 |
From Curve 1 Fraction .75 or From Curve 1 Distance 7.5 |
 |
Through Vertex 5 6
|
The Corner option allows you to specify corners that form logical rectangle the algorithm uses to orient the split on the surface. When analyzing a surface to be split, the software automatically selects the corners that are closest to 90. The Preview option displays the automatically selected corners in red. Sometimes incorrect corners are chosen, so you must specify the desired corners yourself. The split always starts on the side between the first two corners selected and finishes on the side between the last two corners selected. Figure 12 shows a situation where the user had to select corners to get the desired split.
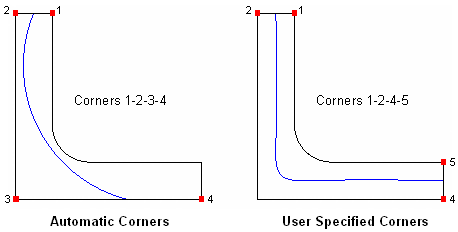
Figure 12 - Selecting the Desired Corners
The split can be directed to the tip of a triangular shaped surface by selecting that corner vertex twice (at the start or end of the corner list) when specifying corners, creating a zero-length side on the logical rectangle. A shortcut exists whereas if you specify only 3 corner vertices, the zero-length side will be directed to the first corner selected. If you specify only 2 corner vertices, a zero-length side will be directed to both the first and second corner you select. Table 4 shows these examples. Note the software will automatically detect triangle corners based on angle criteria - the corner selection methods for zero-length sides explained in this section need only be applied if the angles are outside of the thresholds specified in the Set Split Surface Auto Detect Triangle settings.
Table 4 - Selecting Corners to Split to Triangle Tips
|
Surface
|
Corner Specification
|
|
|
1-2-4-4- or 4-4-1-2 or 4-1-2 (shortcut method) |
|
|
1-1-2-2 or 2-2-1-1 or 1-2 or 2-1 (shortcut method) |
The Direction option allows you to conveniently override the default split direction on a single surface. Simply specify a curve from the logical rectangle that is parallel to the desired split direction. If Corners are also specified, the Direction option will override the split orientation that would result from the specified corner order. The Direction option is not valid on a chain of surfaces. Figure 13 shows an example.
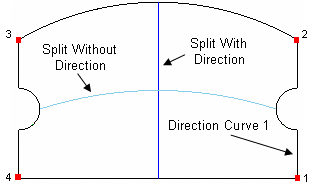
Figure 13 - Direction Specification Overrides Corner Order
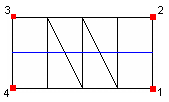
The Segment option allows you to split a surface into 2 or more segments that are equally spaced across the surface. The Fraction option allows you to override the default 0.5 fractional split location. The Distance option allows you to specify the split location as an absolute distance rather than a fraction. By specifying a From Curve, you can indicate which side of the logical rectangle to base the segment, fraction or distance from (versus a random result). Table 5 gives examples of these options.
Table 5 - Segment, Fraction, Distance Examples
|
Surface
|
Command Options
|
 |
Segment 6 From Curve 1
|
 |
Fraction .3 From Curve 1
|
 |
Distance 3 From Curve 1
|
Table 6 - Through Vertex Examples
|
Surface(s)
|
Command Options
|
 |
Fraction .3 From Curve 1 Through Vertex 9
|
 |
Through Vertex 5 6 7 8
|
By default, split locations are calculated in 3D space and projected to the surface. As an alternative, split locations can be calculated directly in the surface parametric space. In rare instances, this can result in a smoother or more desirable split. The command option Parametric {on|Off} can be used to split the given surfaces in parametric space. Alternatively, the default can be overridden with the Set Split Surface Parametric {on|OFF} command.
A single absolute tolerance value is used to determine the accuracy of the split curves. A smaller tolerance will force more points to be interpolated. The tolerance is also used when detecting an analytical curve (e.g., an arc or straight line) versus a spline. A looser tolerance will result in more analytical curves. The default tolerance is 1.0. The command option Tolerance <val> can be used to split the given surfaces using the given tolerance. Alternatively, the default tolerance can be overridden with the Set Split Surface Tolerance <val> command.
It is recommended to use the largest tolerance possible to increase the number of analytical curves and reduce the number of points on splines, resulting in better performance and smaller file sizes. The Preview option displays the interpolated curve points. Table 7 shows the effect of the tolerance for a simple example.
Table 7 - Effect of Tolerance on Split Curve
|
Surface
|
Tolerance
|
 |
2.0
|
 |
1.0
|
 |
0.5
|
 |
0.01
|
The Preview keyword will show a graphics preview (in blue) of the splitting curve (or curves) and the corner vertices (in red) selected for the logical rectangle. The curve preview includes the interpolated point locations that define spline curves. Note that if no points are shown on the interior of the curve, it means that the curve is an analytical curve (line or arc). If the Create keyword is also specified, a free curve (or curves) will be created - these are the internal curves that are used to imprint the surfaces. Table 8 shows some examples.
Table 8 - Graphics Preview
|
Surface
|
Curve Type
|
 |
Spline
|
 |
Arc (no preview points shown on interior of curve)
|
This section describes the settings that are available for the automatic split surface command. To see the current values, you can enter the command Set Split Surface, optionally followed by the setting of interest (without specifying a value).
Set Split Surface Tolerance <val>
This sets the default tolerance for the accuracy of the split curves. See the Tolerance section for more information.
Set Split Surface Parametric {on|OFF}
This sets the default for whether surfaces are split in 3D (default) or in parametric space. See the Parametric section for more information.
Set Split Surface Auto Detect Triangle {ON|off}
Set Split Surface Point Angle Threshold <val>
Set Split Surface Side Angle Threshold <val>
The split surface command automatically detects triangular shaped surfaces as explained in the section on Corners. This behavior can be turned off with the setting above. Two thresholds are used when detecting triangles - the Point Angle threshold and the Side Angle threshold, specified in degrees. Corners with an angle below the Point Angle threshold are considered for the tip of a triangle (or the collapsed side of the logical rectangle). Corners within the Side Angle threshold of 180 are considered for removal from the logical rectangle. In order for a triangle to actually be detected, corners for both the point and side criteria must be met. The default Point Angle threshold is 45, and the default Side Angle threshold is 27. Figure 14 provides an illustration.
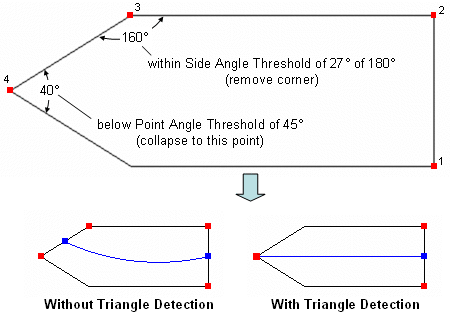
Figure 14 - Triangle Detection Settings
The Split Skew function can be called with the following command:
Split Surface <id_list> Skew [Preview] [Create]
This command will split a surface or list of surfaces in a logical way to reduce the amount of skew in a quadrilateral mesh. This function uses the control skew algorithm to determine where to make these logical splits. Users should note that Split Skew can only be utilized effectively on surfaces that lend themselves to a structured meshing scheme. These surfaces cannot have multiple curve loops. Figure 15 shows a simple example of a surface being split.
split surface 1 skew
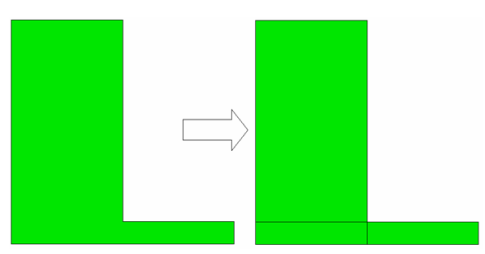
Figure 15. Split Skew applied to an L-shaped surface
The Preview keyword will show a graphics preview of the splitting curves. If the Create keyword is also specified, free curves will be created.