Cubit 15.8 User Documentation
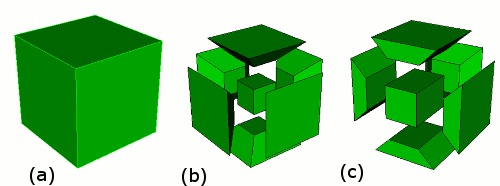
Figure 1: A single hex before (a) and after (b) a pillow operation. The far right (c) depicts a pillow operation with the front surface designated as a 'through' surface.
During a typical pillow operation, the user selects a set of elements, called a 'shrink set', to define what elements will be operated on. All elements on the outer boundary of the shrink set are then shrunk towards the center of the set. New elements are then created to fill the gap between the original boundary and the shrunk boundary. The newly created elements form the pillow around the selected shrink set. Figure 1a and 1b show an example of a pillow operation performed on a single hex. Geometry surfaces, or mesh element faces can be specified as through surfaces for the pillowing operation. This means that the pillow will extend through the selected surfaces, and no new elements will be created along them. Figure 1c shows the effect of pillowing a single hex with one surface selected as a through surface.
In some cases a shrink set may not be valid due to the geometry of a specific region. As the exterior nodes of the shrink set move towards the middle they must be able to maintain appropriate geometric associations. Nodes on vertices must move along curves, nodes on curves must move along surfaces. If there are multiple curves or surfaces along which an exterior node might travel, then the ownership is ambiguous and the pillowing will fail.
Using the optional distance keyword with a specified value allows manual control of the distance that each boundary element is shrunk towards the center of the shrink set. If no distance value is specified, an appropriate value is calculated for each element. If a distance value is specified, all newly created nodes will have their position fixed by default. This allows the user to smooth the mesh without altering the node positions of the newly created hexes. If the optional unfix_nodes keyword is used, this default behavior is changed, and any smooth operations will alter the newly created node locations. By default, a smooth operation is automatically performed following any pillow operation unless the optional no_smooth keyword is used.
Similar analogous commands are available for creating a pillow around a set of two dimensional faces.
Syntax:Pillow Hex <ids> [ Through { [Surface <ids>][Face <ids>][Tri <ids>] } ] [ Distance <value> ] [ Unfix_nodes ] [ No_smooth ]
Pillow Face <ids> [ Through Curve <ids> ] [ Distance <value> ] [ Unfix_nodes ] [No_smooth]

Figure 2: Example model using pillow operations to create ordered nodes a specified distance around the boundary of a mesh.