There are two major ways to create surfaces in CUBIT. First, surfaces can be created in CUBIT by fitting an analytic or spline surface over a set of bounding curves. In this case, the curves must form a closed loop, and only one loop of curves may be supplied. The second method, is by sweeping a curve about an axis, along a vector, or along another curve. The result of these surface creation commands is a "sheet body" or a body that has zero measurable volume (it does however have a volume entity). This body may be decomposed with booleans and special webcutting commands or it may be used as a tool to decompose other bodies. Booleans can be used to cut holes out of these surfaces.
The following options may be used for creating a surface in CUBIT.
1. Bounding Curves: The first form of this command produces an analytic or spline surface fit to cover the bounding curves.
Create Surface Curve <curve_id_1> <curve_id_2> <curve_id_3>...
Another version of this command creates a surface from a set of bounding curves that all lie on one surface. If the curves are selected they must lie on the surface, and they must create a closed loop. The On Surface option forces the surface to match the geometry of the underlying surface exactly.
Create Surface Curve <id_list> On Surface <surface_id>
2. Bounding Vertices or Nodes: The second form of this command uses vertices to fit an analytic spline surface. The On Surface option creates the surface from a set of nodes and vertices that all lie on one surface and restrains the surface to match the geometry of the underlying surface. The project option will project the nodes or vertices to the specified surface.
Create Surface [Node|Vertex| <id_list> [On Surface <surface_id> {Project} ]
3. Copy: The next form creates a surface using the same geometric description of the specified surface. The new surface will be a stand-alone sheet body that is geometrically identical to the user supplied surface.
Create Surface From Surface <surface_id>
4. Extended Surface: The fourth form of the command creates a surface that is extended from a given surface or list of surfaces. The specified surface's geometry is examined and extended out "infinitely" relative to the current model in CUBIT (i.e. extended to just beyond the bounding box of the entire model). The given surfaces are extended as shown in the table.
Create Surface Extended From Surface <surface_id>
Table 1. Surface Extension Results
|
Surface Type |
Resulting Extended Surface |
|
|
Spherical |
Shell of Full Sphere |
|
|
Planar |
Plane of infinite size relative to model |
|
|
Toroidal |
Shell of Full Torus |
|
|
Conical, cone, cylinder... |
Shell of outside conic axially aligned with given conic of infinite height relative to model |
|
|
Spline |
Surface is extended to extents of the spline definition. This may not be any further than the surface itself, so caution should be used here. |
|
Multiple surfaces can be offset at the same time to form a sheet body, by using the Create Sheet Extended from Surface command.
5. Planar Surface: The following commands create planar surfaces. The first passes a plane through 3 vertices, the second uses an existing plane, the third creates a plane normal to one of the global axes, and the fourth creates a plane normal to the tangent of a curve at a location along the curve. By default, the commands create the surface just large enough to intersect the bounding box of the entire model with minimum surface area. Optionally, you can give a list of bodies to intersect for this calculation. You can also extend the size of the surface by either a percentage distance or an absolute distance of the minimum area size. The plane can be previewed with the command Draw Plane [with]... (where the rest of the command is the same as that to create the surface).
Create Planar Surface [With] Plane Vertex <v1_id> [Vertex] <v2_id> [Vertex] <v3_id> [Intersecting] Body <id_range>] [Extended Percentage|Absolute <val>]
Create Planar Surface [With] Plane Surface <surface_id> [Intersecting] Body <id_range>] [Extended Percentage|Absolute <val>]
Create Planar Surface [With] Plane {Xplane|Yplane|Zplane} [Offset <val>] [Intersecting] Body <id_range>] [Extended Percentage|Absolute <val>]
Create Planar Surface [With] Plane Normal To Curve <curve_id>{Fraction <f>| Distance <d> | Position <xval><yval><zval> | Close_to vertex <vertex_id>} [[From] Vertex <vertex_id> (optional for 'fraction' & 'distance')] [Intersecting] Body <id_range>] [Extended Percentage|Absolute <val>]
6. Net Surface: Net surfaces can be created with two different commands. A net surface passes through a set of curves in the u-direction and a set of curves in the v-direction (these u and v curves would looked like a mapped mesh). The first form of the command uses curves to create the net surface. The curves must pass within tolerance of each other to work. The second form uses a mapped mesh to create the surface. The mapped mesh can be of a single surface or a collection of mapped or submapped surfaces that form a logical rectangle. By default net surfaces are healed to take advantage of any possible internal simplification.
Create Surface Net U Curve <id_list> V Curve <id_list> [Tolerance <value>] [HEAL|Noheal]
Create Surface Net [From] [Mapped] Surface <id_list> [Tolerance <value>] [HEAL|Noheal]
A suggested geometry cleanup method is to use a virtual composite surface to map mesh a set of complicated surfaces then create a net surface from this mesh. Then the original surfaces can be removed with the noextend option and the new net surface combined back onto the body.
7. Offset: The following command creates surfaces offset from existing surfaces at the specified distances.
Create Surface Offset [From] Surface <id_list> Distance <val>
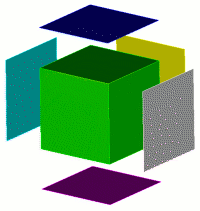
The surface offset command will only translate the existing surfaces, without extending or trimming them. An alternate form of the command for sheet bodies will maintain connections between surface by extending or trimming as they are offset, shown in Figure 1. On the left, the surfaces are offset using the surface offset command. On the left, the surface is created by using the "sheet" version of the command.
Figure 1. Offsetting surfaces to form individual surfaces or sheet bodies
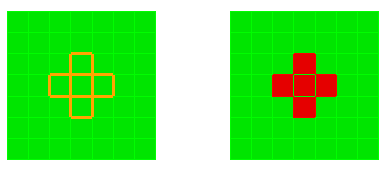
8. Skinning: The following command creates a skin surface from a list of curves. An example of a skin surface is to create a surface through a set of parallel lines.
Create Surface Skin Curve <id_list>
9. Sweeping of Curves: A curve or a set of curves can be swept along a path to create new surfaces. The path may be specified as an axis and angle, a vector and distance, by indicating another curve or set of contiguous curves, or by specifying a target plane. The following commands show the options available:
Sweep Curve <curve_id_range> { Axis <xpoint ypoint zpoint xvector yvector zvector> | Xaxis | Yaxis | Zaxis } Angle <degrees> [Steps <Number_of_sweep_steps>] [Draft_angle <degrees>] [Draft_type <integer>] [Make_solid] [Include_mesh] [Keep][Rigid]
Sweep Curve <curve_id_range> Vector <xvector yvector zvector> [Distance <distance>] [Draft_angle <degrees>] [Draft_type <integer>] [Include_mesh] [Keep] [Rigid]
Sweep Curve <curve_id_range> Along Curve <refcurve_id_range> [Draft_angle <degrees>] [Draft_type <integer>] [Include_mesh] [Keep] [Rigid]
Sweep Curve <curve_id_range> Target Plane <options>
Sweep Curve <curve_id_range> Target {Volume|Body} <id> Direction {options} [Plane <options>] [Unite]
In the first command, the steps options provides a way of faceting the sweep, so instead of a smooth round sweep, there are facets to the surface. The make_solid option closes the newly-created surface to the axis, so that a solid is created instead of a surface.
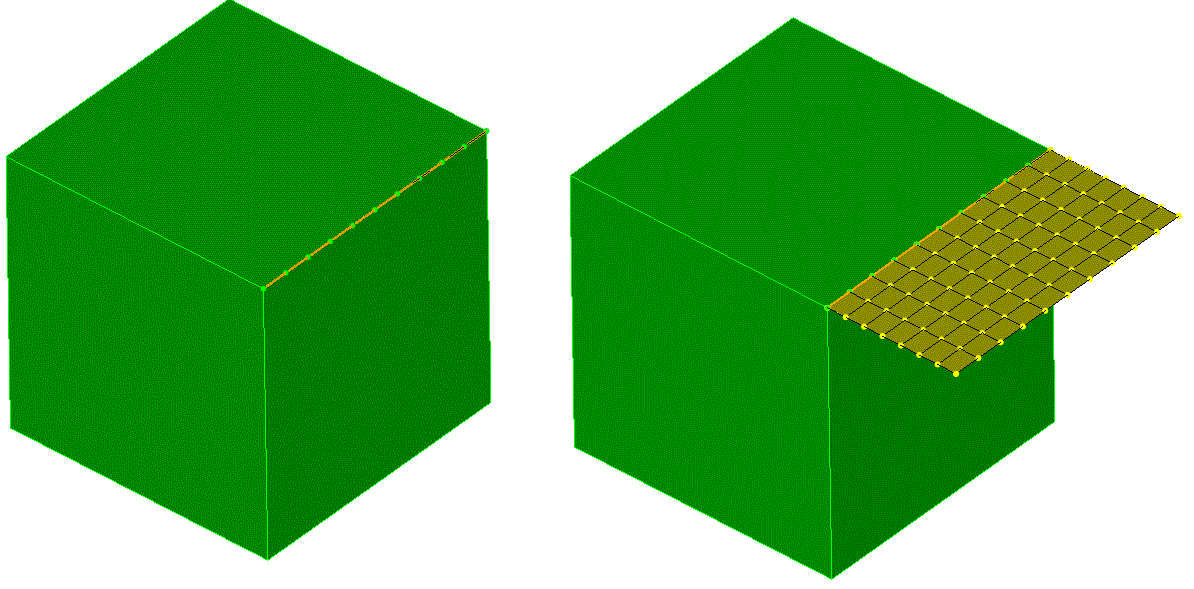
In the above commands, the include_mesh option will create a surface mesh if the curve is already meshed (see figure below). The keep option will keep the original curve while creating the surface.
The sweep curve target plane command sweeps a curve until it hits a target plane. The options for the target plane are described under Specifying a Plane.
The last command sweeps a curve to a target volume or body and can only be used on sheet bodies. Use the direction keyword to specify the sweep direction and the plane keyword to specify a stopping plane. The unite keyword will unite the sheet bodies after sweeping
The other options are as follows:
draft_angle: determines how much drafting in of the surface is desired
draft_type:
0 => extended (draws two straight tangent lines from the ends of each segment until they intersect)
1 => rounded (create rounded corner between segments)
2 => natural (extends the shapes along their natural curve) ***
rigid: normally the curve will rotate to maintain its original orientation to the sweep path. The rigid option disallows this rotation.
10. Midsurface: Multisurfaces may be created midway between pairs of surfaces using the following command:
Create Midsurface {Body|Volume} <id> Surface <id11> <id12> ... <idN1> <idN2>
where N denotes the number of pairs of surfaces. An even number of surfaces must be specified, and the command will group them by pairs in the order in which they are provided. The resulting surface will be trimmed by the specified body or volume <id>. This replaces the Create Midplane command in previous versions of CUBIT.
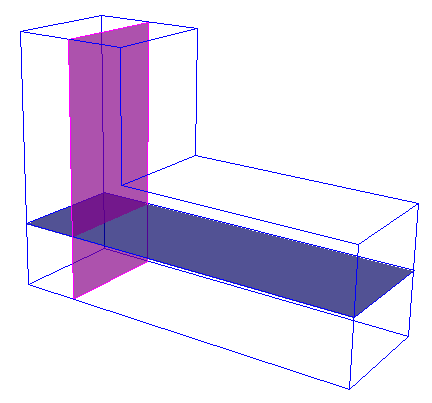
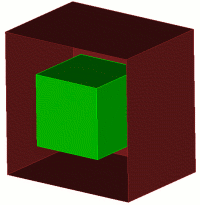
Figure 2. Multisurface created with the Create Midsurface command
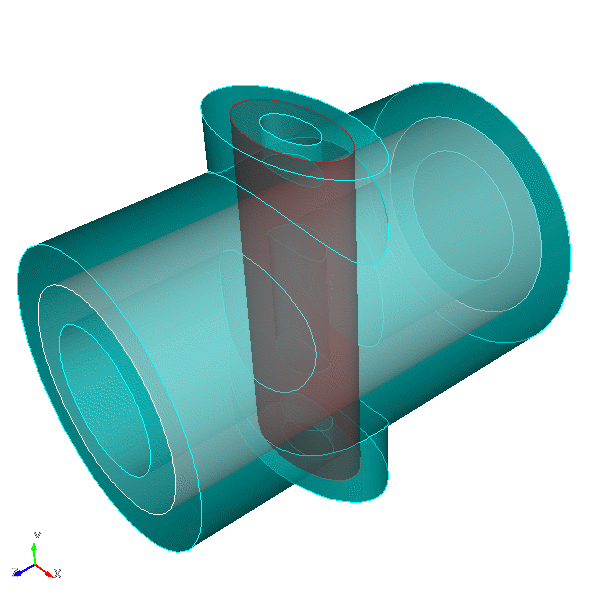
Figure 3. Midsurface created from 2 pairs of cylindrical surfaces
Midsufaces can also be extracted without surface pair specification if the resulting surface is a single sheet of surfaces (no T intersections). The following is the command syntax for automatic midsurface extraction:
Create Midsurface {Body|Volume} <id_range> Auto [Delete] [Transparent] [Thickness] [Limit <lower_bound> <upper_bound>] [Preview]
Figure 4 shows a simple auto midsurface example. The command for the example is:
create midsurface volume 1 auto delete
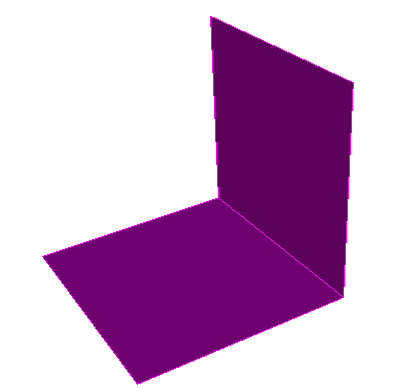
Figure 4. Midsurface created from a volume
The command option descriptions are listed below.
Auto enables the automatic mid-surface algorithm. Turning Auto off requires the user to specify a single surface pair to create a mid-surface.
Transparent shows the successfully midsurfaced volumes as transparent in the graphics display
Thickness applies a 2D property to the created mid-surface geometry.
Limit search range gives the algorithm a range to find surface pairs within.
11. Weld Profile: Surfaces may be created by specifying a weld profile using the following command:
Create Surface Weld [Root] Location {options} Weld Surface <id_list> Length <val> [<val2>]
Weld surfaces can be used to create a simulated welded joint by sweeping the surface along the root curve and uniting the new body to the model. An example of the command is illustrated below. For a detailed description of the location specifier see Location Direction, and Axis Specification.
create surface weld root location vertex 25 weld surface 13 14 length 2
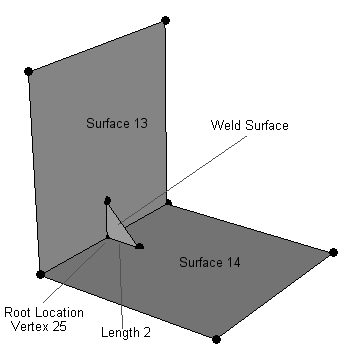
Figure 5. Weld Profile surface with length and root specifications
12. Creating A Surface From Mesh Entities: Surfaces may be created from the boundaries of meshed volumes, surfaces, and/or from individual quadrilateral mesh elements. The individual option makes it so you can enter multiple surfaces at once, and not have them merged together into a larger surface, but instead retain their own original boundaries. The optional tolerance value allows the user to specify a tolerance to which the resulting surface should be fit. The default value is 0.001. If surface creation fails, increasing the tolerance value can help.
Create Acis [From] {Surface <id_range> | Volume <id_range> | Face < id_range> [Individual]} [Tolerance <value>]
Figure 6. Acis Surface created from a Set of Quadrilaterals
13. Creating a Circular Surface: This command creates a 2D circular surface. The surface will be centered at the origin and on the z-plane if a plane option is not specified.
create surface circle radius <value> {xplane|yplane|ZPLANE}
This command creates a 2D circular surface by specifying three vertices; the first vertex will be the center of the surface, the second vertex will be used to define the radius of the surface, and the third vertex will assist in defining the plane that the surface will lie in.
create surface circle center vertex <v1_id> <v2_id> <v3_id>
This command creates a 2D circular surface by forming a circular curve through three points.
create surface circle vertex <v1_id> <v2_id> <v3_id>
14. Creating a Parallelogram: This command creates a 2D parallelogram surface, centered at the origin, by specifying three corner vertices. These vertices will form three consecutive corners of the parallelogram surface.
create surface parallelogram vertex <v1_id> v2_<id> <v3_id>
15. Creating an Ellipse: This command creates a 2D elliptical surface, centered at the origin, by specifying at least a major radius. On an x-y plane this radius will be the radius along the x-direction. The minor radius will be the radius along the y-direction. By default, the surface will lie in the z-plane.
Create Surface Ellipse major radius <value> [minor radius <value>] [xplane|yplane|ZPLANE]
This command creates a 2D elliptical surface using three vertices. The first two vertices define the major and minor radii of the ellipse surface. The third point defines the center of the ellipse. It is important to note that a line from v1_id to v3_id must be orthogonal to a line from v2_id to v3_id, otherwise the command will fail.
Create Surface Ellipse vertex <v1_id> <v2_id> <v3_id>
16. Creating a Rectangle: This command creates a rectangular surface centered at the origin. If only a width value is specified, the surface will be a square. On an x-y plane, the width value is the x-direction and the height is the y-direction. By default, the surface will lie in the z-plane.
Create Surface rectangle width <value> [height <value>] [xplane|yplane|ZPLANE]