Cubit 15.2 User Documentation
The mouse can be used to navigate through the scene using various view transformations. These transformations are accomplished by clicking a mouse button in the graphics window and dragging, sometimes while holding a modifier key such as Shift or Control. When run with graphics on, CUBIT is always in mouse mode; that is, mouse-based transformations are always available, without needing to enter a CUBIT command.
Mouse-based view transformations are accomplished by placing the pointer in the graphics window and then either holding down a mouse button and dragging, or by clicking on a location in the graphics window. Some functions also require one or more modifier keys to be held down; the modifier keys used in CUBIT are Shift ![]() and Control
and Control ![]() . Each of the available view transformations has a default binding to a mouse button-modifier key combination. This binding can be changed by the user if desired. Transformations and button mappings are summarized in the following table.
. Each of the available view transformations has a default binding to a mouse button-modifier key combination. This binding can be changed by the user if desired. Transformations and button mappings are summarized in the following table.
Note: These settings are applicable only to the UNIX command line version of CUBIT. For a description of the Graphical User Interface Mouse Operations see GUI View Navigation.
The bindings are based on the following mouse button definitions:

Figure 1. Default Mouse Function Mappings for the Command Line
Table 1. Mouse Function Bindings for Zoom, Pan, and Rotate
|
Function
|
Description
|
Binding
|
|
Rotate
|
Rotates the scene about the camera axis. Dragging the mouse near the center of the graphics window will rotate the camera's X- or Y-axis; dragging near the edge of the window will rotate about the Z-axis (i.e. about the camera's line of sight). Type a u in the graphics window to see the dividing line between the two types of rotation. |
B1
|
|
Zoom
|
Zooms the scene in or out by clicking the mouse in the graphics window and dragging up or down. If the mouse has a wheel, the wheel will also zoom. |
B2
|
|
Pan
|
"Drags" the scene around with the mouse |
B3
|
|
Navigational Zoom
|
Zooms the scene by moving both the camera and its focal point forward. |
|
|
Telephoto Zoom
|
Zooms the scene by decreasing the field of view. |
|
|
Pan Cursor
|
Click on new center of view |
|
The default mapping of functions to mouse buttons, described in the Default Mouse Function Mappings table above, can be modified. There are two ways to assign a function to a button/modifier combination.
First, you can use the command
Mouse Function <function_id> Button <1|2|3> [Shift][Control]
Type Help Mouse Function to see a list of function IDs that may be used in this command.
Second, you can assign functions interactively. To do so, first put the pointer into a graphics window and then hit the F key. On-screen instructions will lead you through the rest of the process.
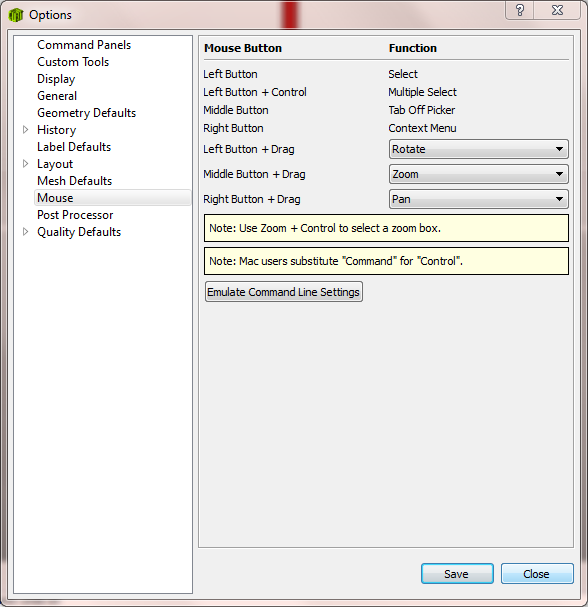
The GUI Options panel for managing the mouse bindings can be found at Tools/Options/Mouse, and is as follows:
After performing view transformations, it may be useful to return to a previous view. A view is restored by setting the graphics camera attributes to a given set of values. The following keys, pressed while the pointer is in the graphics window, provide this capability:
V - Restores the view as it was the last time Display was entered.
F1 to F12 - These function keys represent 12 saved views. To save a view, hold down the Control key while pressing the function key. To restore that view later, press the same function key without the Control key.
Note: In the Graphical User Interface version the F1, F2 and F3 keys are used as an alternate form of dynamic viewing, therefore the ability to save views is not currently supported in the GUI.
You can also save a view by entering the command
View Save [Position <1-12>] [Window <window_id>]
The current view parameters will be stored in the specified position. If no position is specified, the view can be restored by pressing V in the graphics window. If a position is specified, the view can be restored with the command
View Restore Position <1-12> [Window <window_id>]
These commands are useful in as entries in a .cubit startup file. For example, to always have F1 refer to a front view of the model, the following commands could be entered into a .cubit file:
From 0 1
At 0
Up 0 1 0
Graphics Autocenter On
View Save Position 1
The first three commands set the orientation of the camera. The fourth command ensures that the model will be centered each time the view is restored. The final command saves the view parameters in position 1. The view can be restored by pressing F1 while the cursor is in a graphics window.
Additionally, you can change the 'gain' on the mouse movements by changing the mouse gain setting, via the command:
Mouse Gain <value>
where a value of 3 would be 3X as sensitive to mouse movements, and a value of 0.5 would be half as sensitive.
Set ReverseZoom {on|off}
Another user preference, the direction of 'zooming' obtained by using the mouse can be 'flipped', by toggling the reversezoom setting.